By: Team T12-4 Since: Feb 2019 Licence: MIT
1. Introduction
1.1. PDF++ ?
PDF++ is a desktop application that is meant for anyone who wants or needs a convenient tool that helps them manage all the documents in their computer. This application can be used by both Text Input (TI) and a Graphical User Interface (GUI) hence, both technical users and casual users can enjoy a comfortable experience using our program. All the features provided by our application can be used via the TI and relevant feedback, based on your input, will be displayed in the Output Area of the application.
| The current version of our application supports PDF documents only. However, we aim to provide support for many more file types in the future. |
1.2. Proper Usage of PDF++
PDF++ aims to replace your existing File Management System, all operations concerning file management should be done through the application. In order to ensure smooth user experience, you should not perform any file manipulation actions on the files themselves. It is recommended that once you add a file to our application, you should only make changes to those files through our application to prevent the application from misbehaving.
Furthermore, due to security features provided by the Operating Systems, some actions cannot be performed on the files if they are currently opened (In any PDF Viewer). Please ensure that your files are closed prior to performing any actions on them.
This File Management System plans to enhance your typical experience managing your documents and it strives to be the last document manager you will ever need. It includes a multitude of functions that will elevate your PDF reading and management experience. You can refer to the table of contents on the left side of this screen to indulge in the many features provided by our app and with many more to come! Are you fascinated by PDF++? What are you waiting for? Jump to the Section 2, “Quick Start” to get started. Enjoy!
| The words "app" and "application" are used interchangeably in this document and mainly refer to the PDF++ Application. |
2. Quick Start
-
Ensure you have Java version
9or later installed in your Computer. -
Download the latest
pdfplusplus.jarhere. -
Copy the file to the folder you want to use as the home folder for your PDF++.
-
Double-click the file to start the app. The GUI should appear in a few seconds.
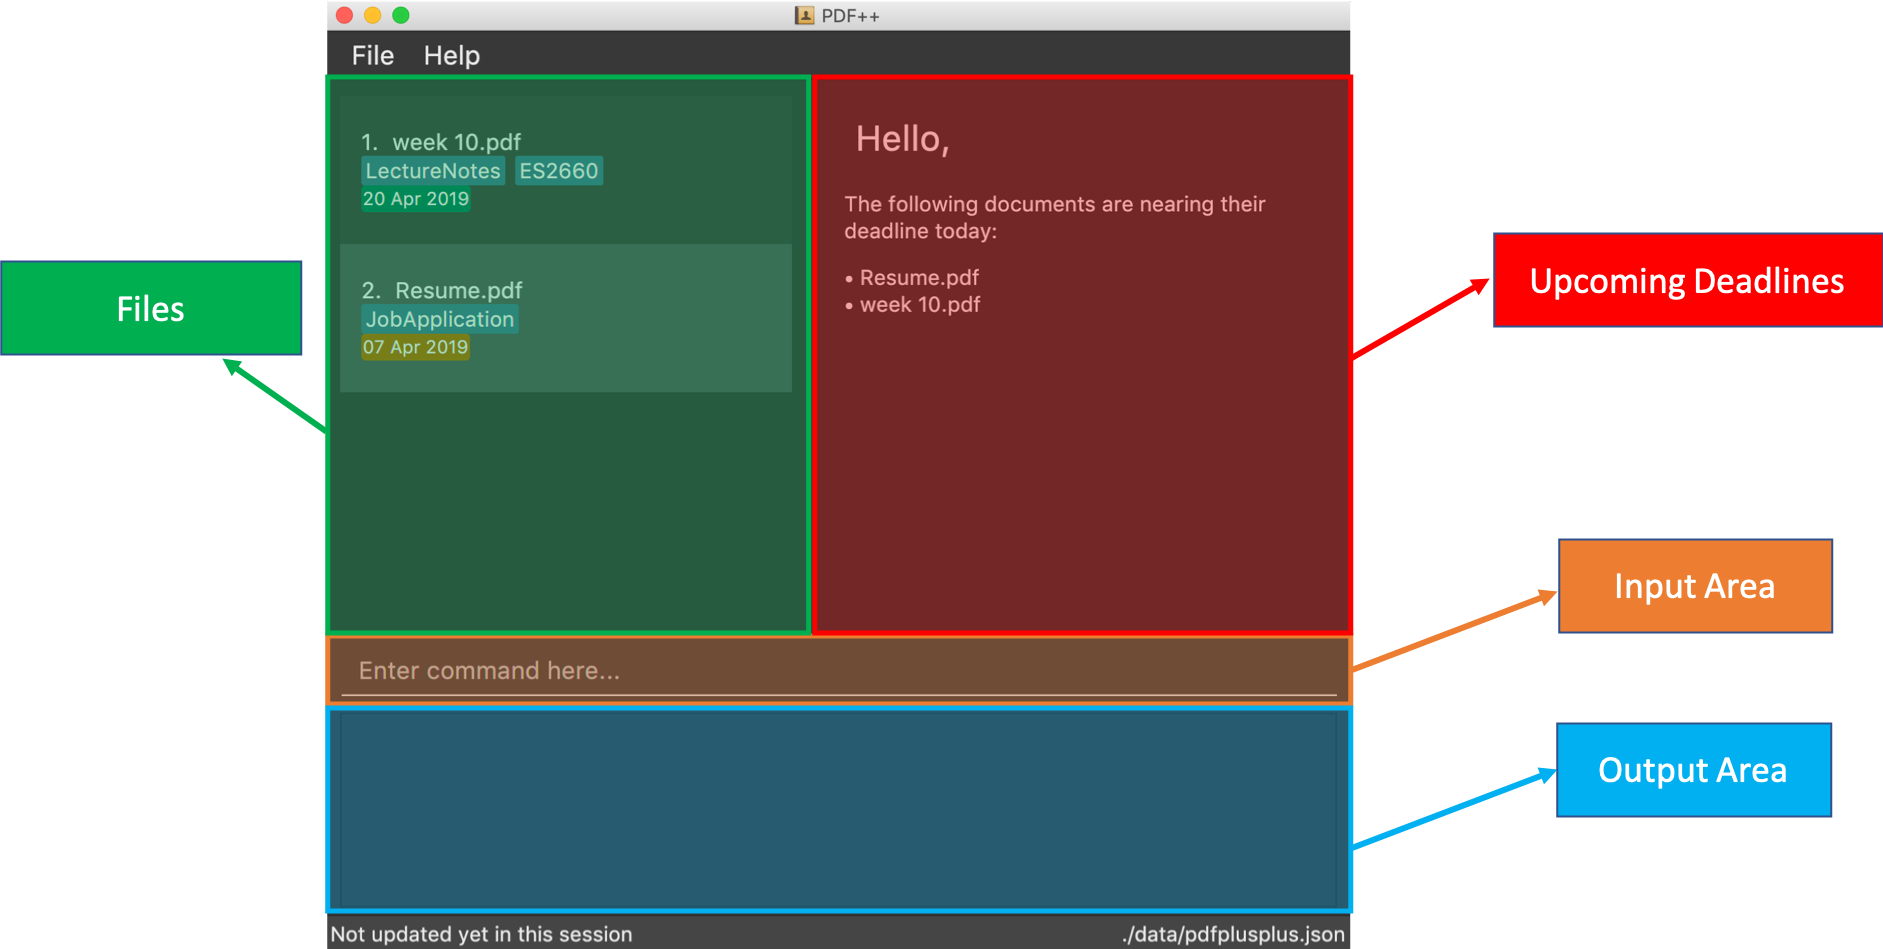 Figure 1. PDF++ Layout
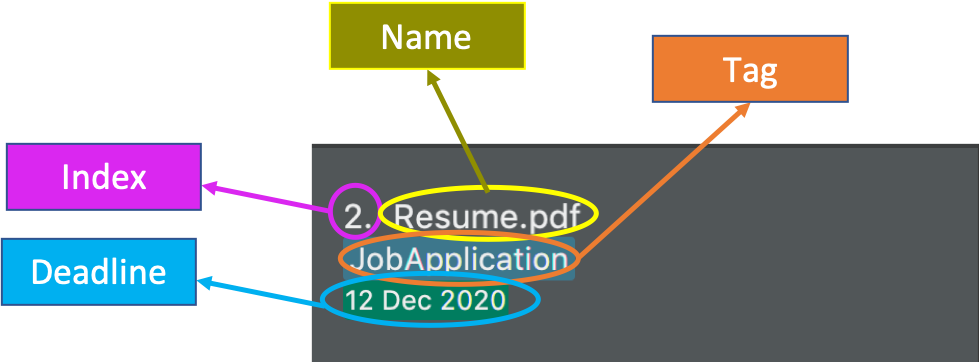 Figure 2. Individual File Representation
 -
Type any commands in the Input Area, also known as the Command Box, highlighted by the Orange area and press Enter to execute it.
e.g. typinghelpin the command box and pressing Enter will open this PDF++ User Guide. -
Some example commands you can try:
-
list: Lists all files currently managed in PDF++. -
help: Opens the User Guide. -
delete INDEX: deletes the file indexed atindexon the list and all its relevant information from PDF++. -
exit: exits the app
-
-
Refer to Section 3, “Features” for details of each command.
3. Features
| Please ensure that you have the permissions to Read, Write and Execute the files that you wish to manage through our application. You may use a web search, like Google, to assist you in identifying if you possess the relevant permissions. If you are lacking these permissions our application may not be able to carry out the actions you specify. |
| Please do not manipulate the files once you have added them to our application. Unforeseen actions such as moving, renaming and others might result in unexpected behaviour by the application. Our application is meant to replace the need for you to perform these actions manually on your files yourselves. |
| If your file is open please close it before proceeding to perform ANY other actions in the application. If the file is kept open, the application may misbehave as it is sharing access to the file with other unknown applications. |
| Certain commands may take a longer time to run depending on the size of the files that you are dealing with. Hence the Operating System may wrongly detect that the application is not responding, when it in fact is. Hence, should you see the "application not responding" pop-up from the operating system, it is actually still working in the background. Therefore, please allow the application some time to complete the task that you have assigned it. Thank you. |
Command Format
-
Texts such as
f/ort/ordate/and are prefixes that signify information that is required by a particular command. -
Words in
UPPER_CASEare the additional information that you need to input e.g. inadd f/FILENAME,FILENAMEis a parameter which you need to input. -
Items with
… after them can be used multiple times or zero times e.g.t/TAG…can be left blank or used multiple times,t/TagA t/TagB t/TagCetc. -
ALL Commands are to be entered in the Input Area that is highlighted in Orange.
-
ALL Responses to your input Commands will be displayed in the Output Area that is highlighted in blue.
3.1. Viewing the User Guide : help
Format: help
The help command displays this page for any references you may need or questions that you may require answers to.
3.2. Adding a file: add
The add command allows you to add a file through TI into to the application, or through the GUI.
The added file will appear in the Files Section, highlighted in green, shown above.
| Files with the same name can be added to our application provided that they are not in the same directory. Just as any Operating System would allow the existence of files with the same name in different directories. |
The Add feature has the following syntax:
Format: add
Format: add f/PATH_TO_FILE
-
PATH_TO_FILErefers to the path to thePdfyou wish to add -
Entering
addwithoutf/PATH_TO_FILEwill open the file selection GUI for the user toadda file to our application. -
The file must be a PDF file (with .pdf extension).
Example:
-
add f/C:\Users\Raj\Documents\Tutorial3.pdf[Windows Operating System] -
add f//Users/raj/Desktop/CS2101 Lecture.pdf[Mac / Linux Operating System] -
add[Any Operating System]
Please ensure that you have entered the full PATH_TO_FILE. Please refer to
Step-by-Step Guide below for a detailed guide on the steps necessary
to obtain the full PATH_TO_FILE.
|
3.2.1. Step-by-Step Guide
Illustrated below is a sample usage scenario that provides a clear view of the inner workings of the Add feature.
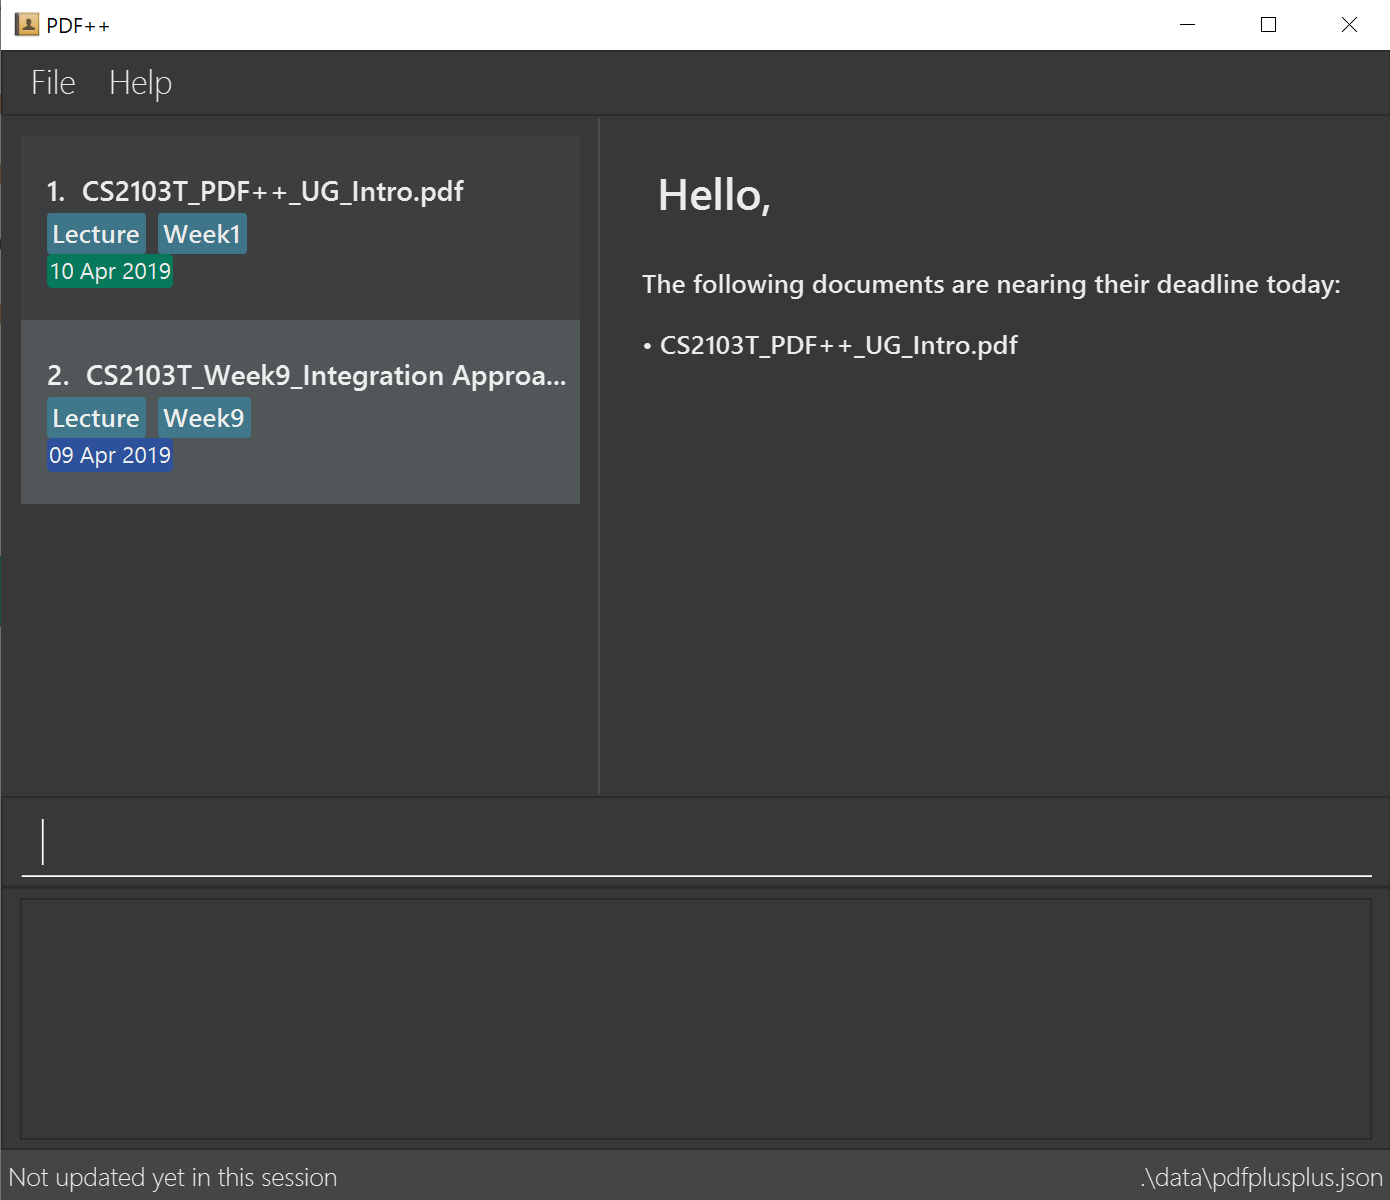
Step 1: Launch the application by double-clicking the pdfplusplus.jar. To view the following screen.
| You may see different files in your application based on the actions that you have carried out before. |
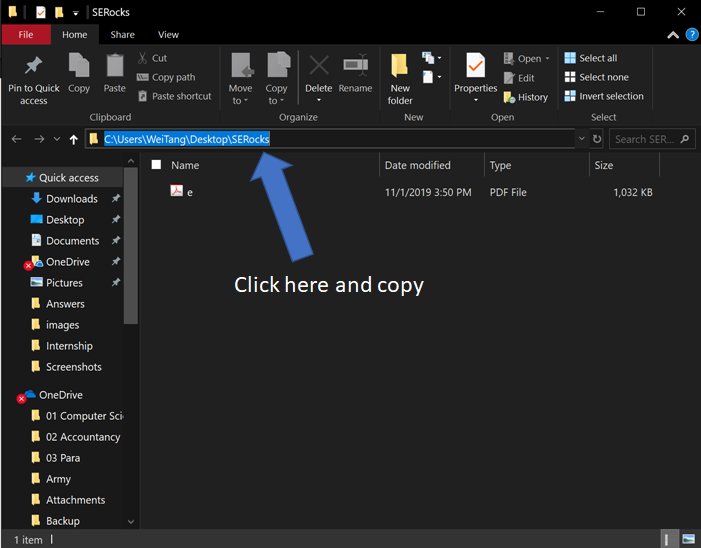
Step 2: Once the application is opened you should navigate to the folder, which contains the file which you wish to add to the application, to obtain the path to the file through the following methods:
-
For Windows
Once you have navigated to the necessary folder, click on the address bar and copy the path as shown below.
-
For Mac
Right-click the file that you wish to add to our application and you should see the following menu pop up.
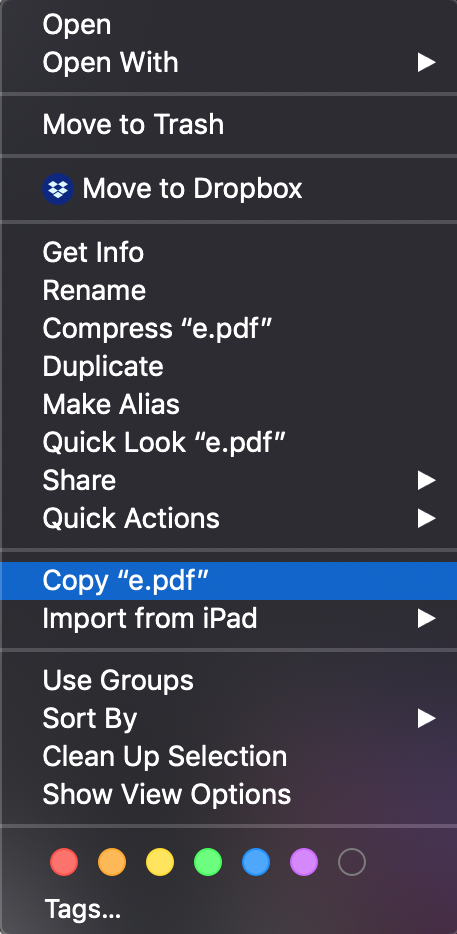
-
When this menu appears, if you press option on your keyboard, you should see the menu change to match the image shown below.
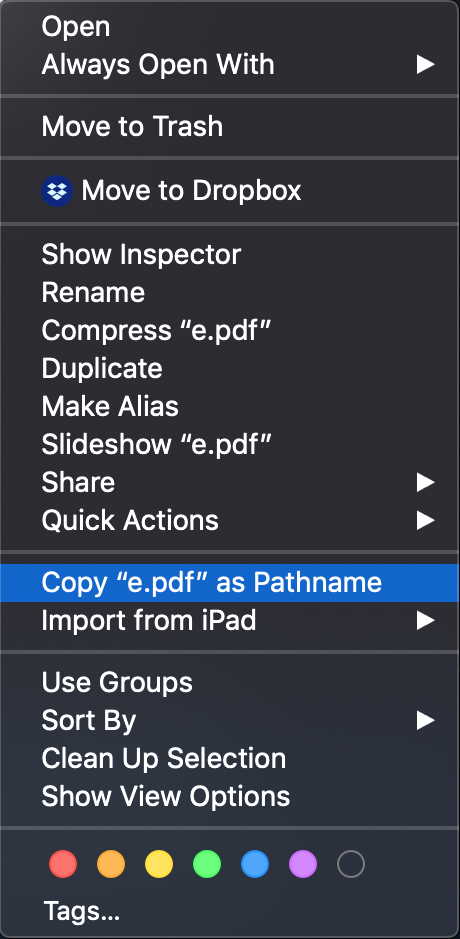
-
Now if you press the button highlighted in blue, you would have successfully copied the path of the file you wish to add to the application.
| For Mac OS: These steps can be replicated to get the path to a particular folder on your computer as well. Instead of selecting a file, select the folder which you wish to get the path to and repeat the steps. |
Step 3: You may now enter the add command into the CLI interface followed by the
path of the file you wish to add to the application as illustrated below.
| Windows users must type the file name after pasting the directory, which you copied in copied at Step 2, in to the application. |
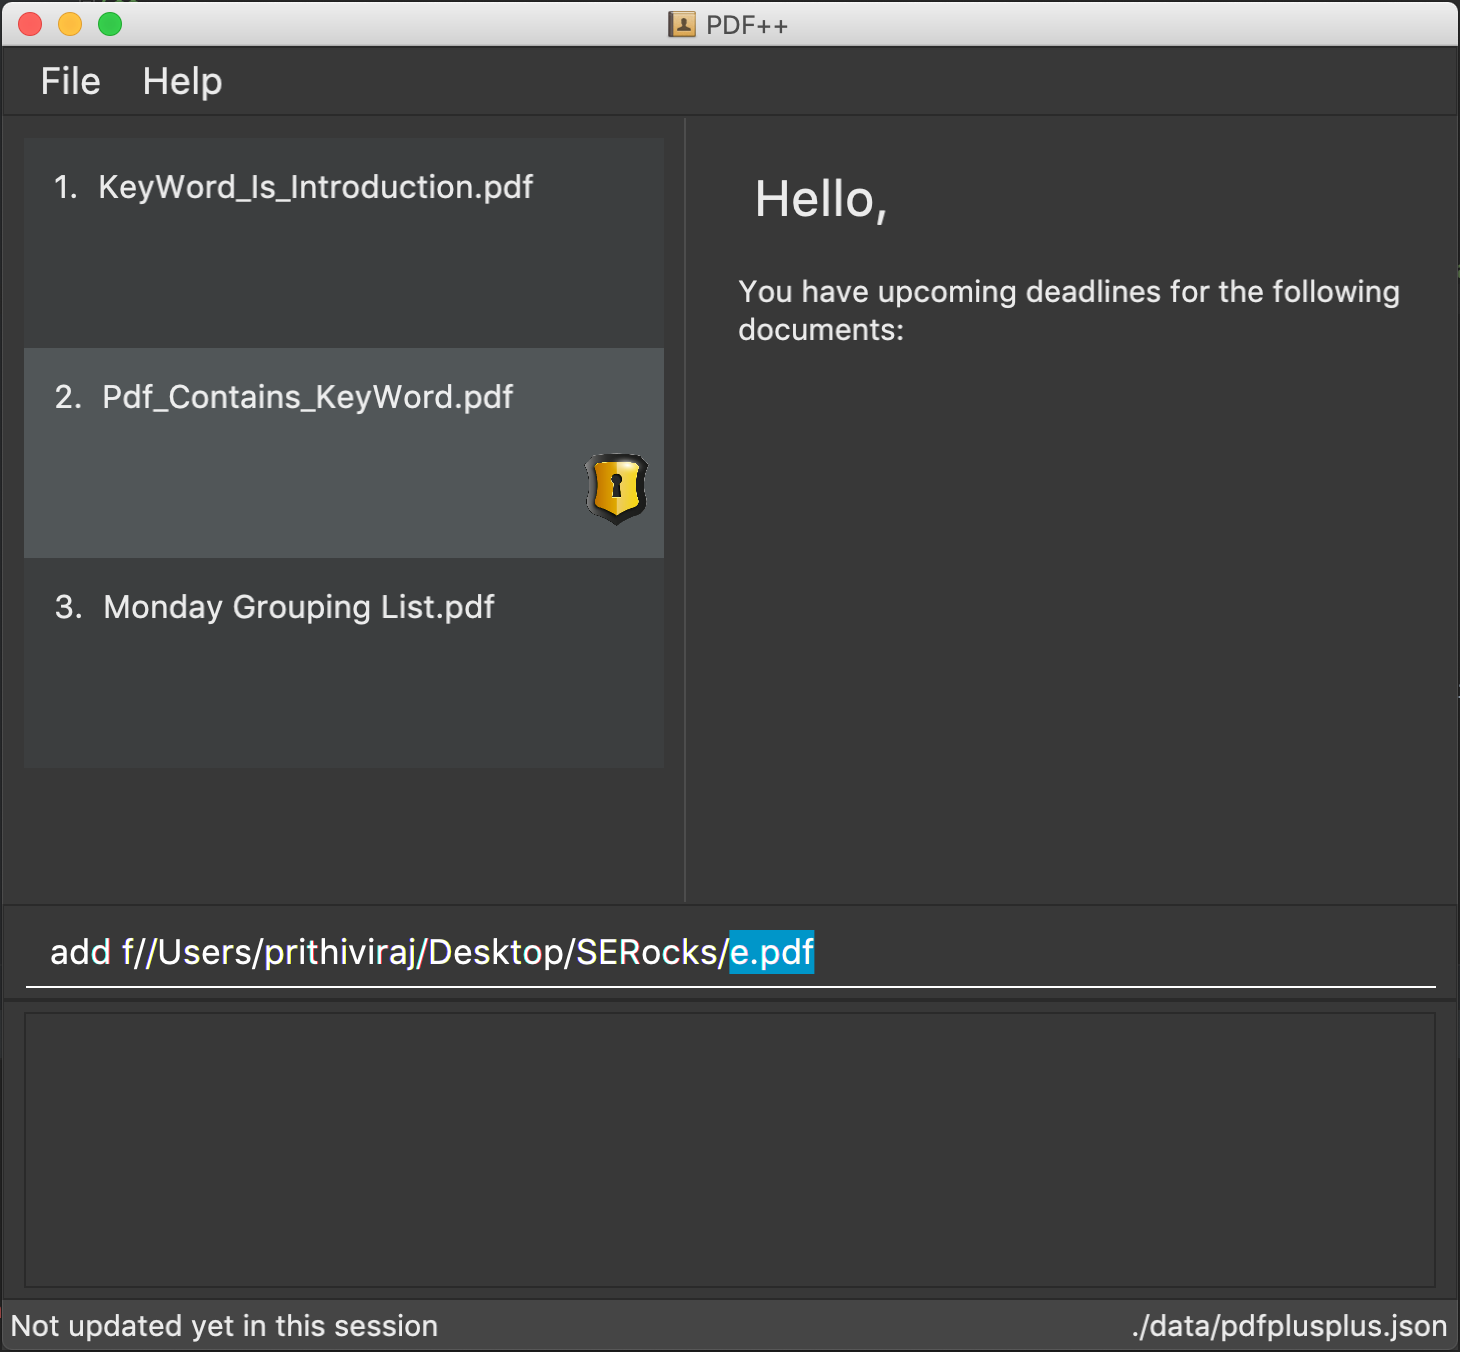
You can simply type add and hit enter, to open up a GUI for you to select the file you
wish to add.
|
Step 4: Upon hitting enter Your file is added into the application.
As of v1.4, the Add command is only capable of adding 1 Pdf file at a time. By v2.0,
the feature will support adding multiple files.
|
3.3. Listing all files : list
The list command shows you a list of all files that are tracked by the application.
The files will be displayed in the Files Section of the application, highlighted in green.
Format: list
3.4. Sorting all files : sort
The sort command allows you to sort all the files in the application based on the input criteria.
Hence you may be able to, for example, sort the files by their name in ascending or descending order.
Format: sort CRITERIA ORDER
Example:
-
sort name up -
sort deadline down -
sort size up
3.5. Opening a file : open
The open command allows you to open an existing file, specified by the index of the file that is next to the name of the file in the Files Section, highlighted in green.
The selected file will then be opened with any application that you have set as the default for
your computer.
Format: open INDEX
-
INDEXrefers to the index of the file that you wish to edit.
Example:
-
open 3
| Please close the opened file before proceeding to perform ANY other actions in the application. If the file is kept open, the application may misbehave as it is sharing access to the file with other unknown applications. |
3.6. Renaming a file : rename
The rename command allows you to change the name of a file, specified by the index of the file that is next to the name of the file in the Files Section, highlighted in green.
Format: rename INDEX n/NEWNAME
-
INDEXrefers to the index of the file that you wish to edit. -
NEWNAMErefers to the new name that you wish to give your file.
Example:
-
rename 1 n/newname.pdf
3.6.1. Step-By-Step Guide
SStep 1: Launch the application by double clicking the pdfplusplus.jar. To view the following screen.
| You may see different files in your application based on the actions that you have carried out before. |
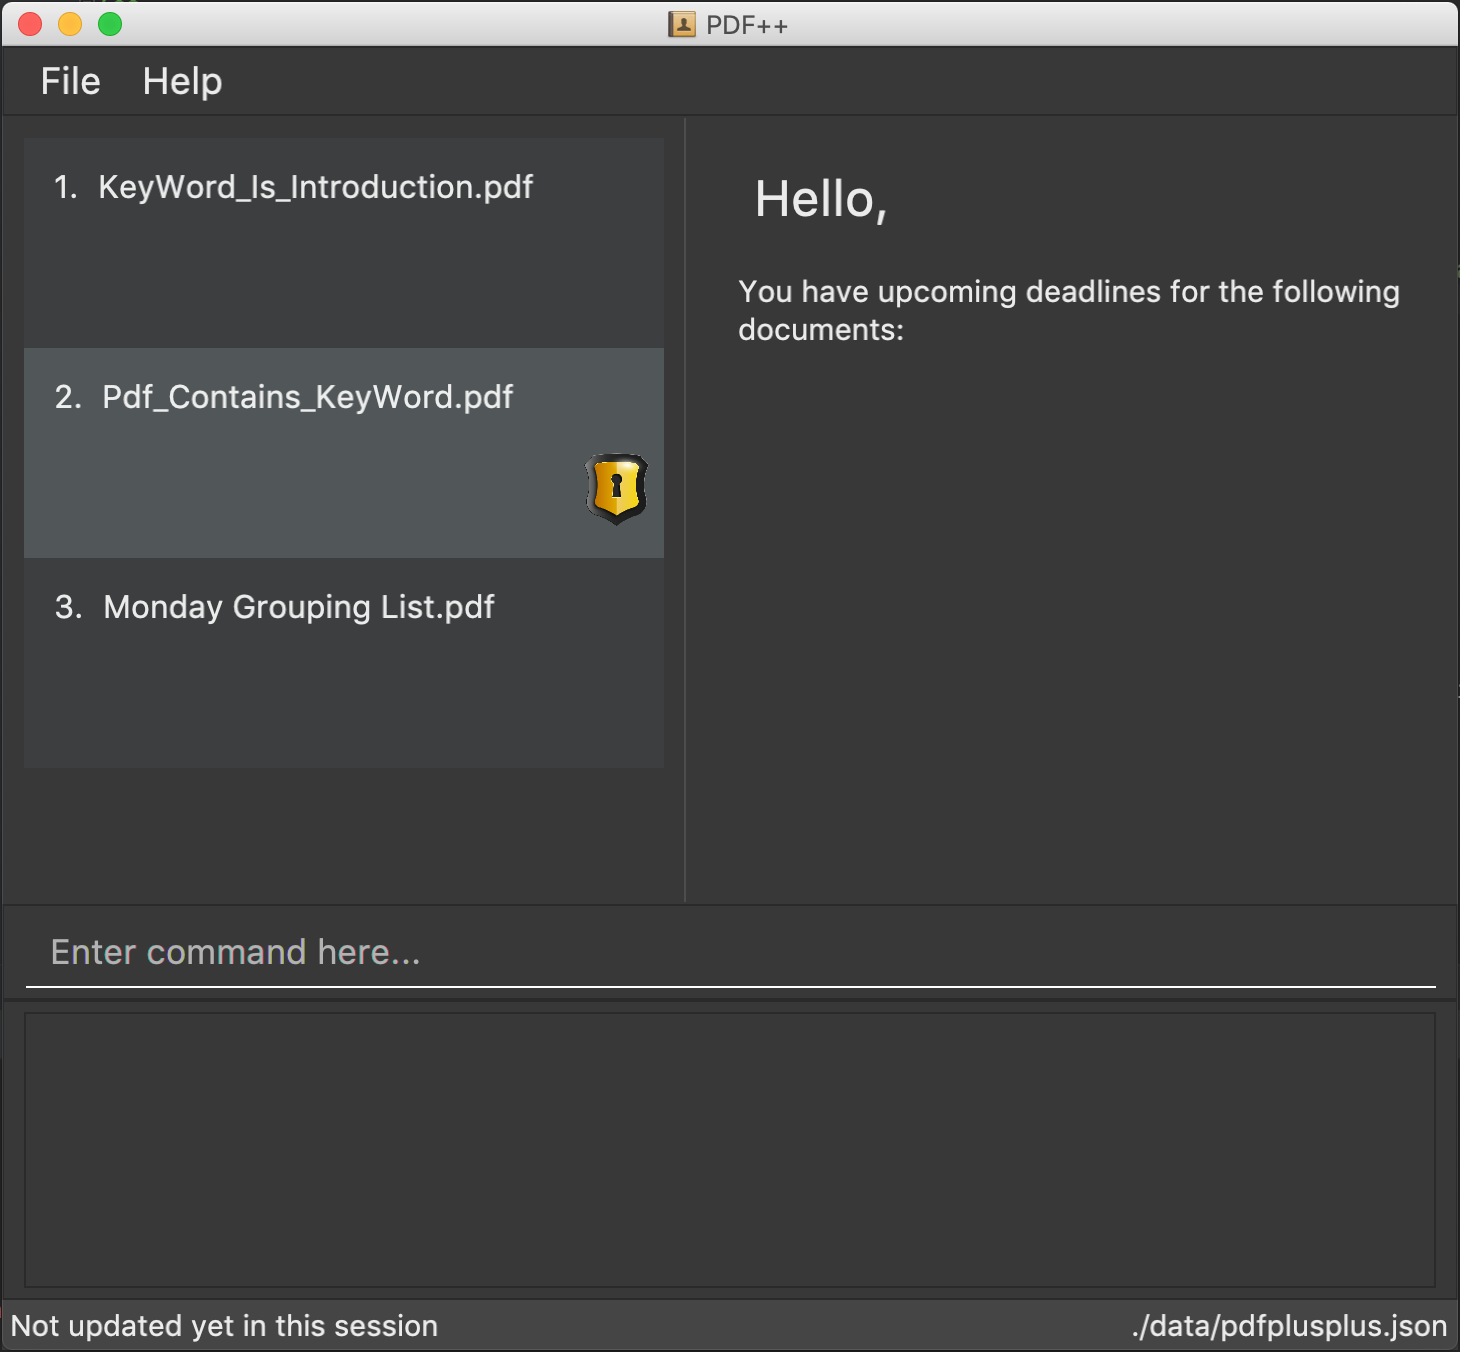
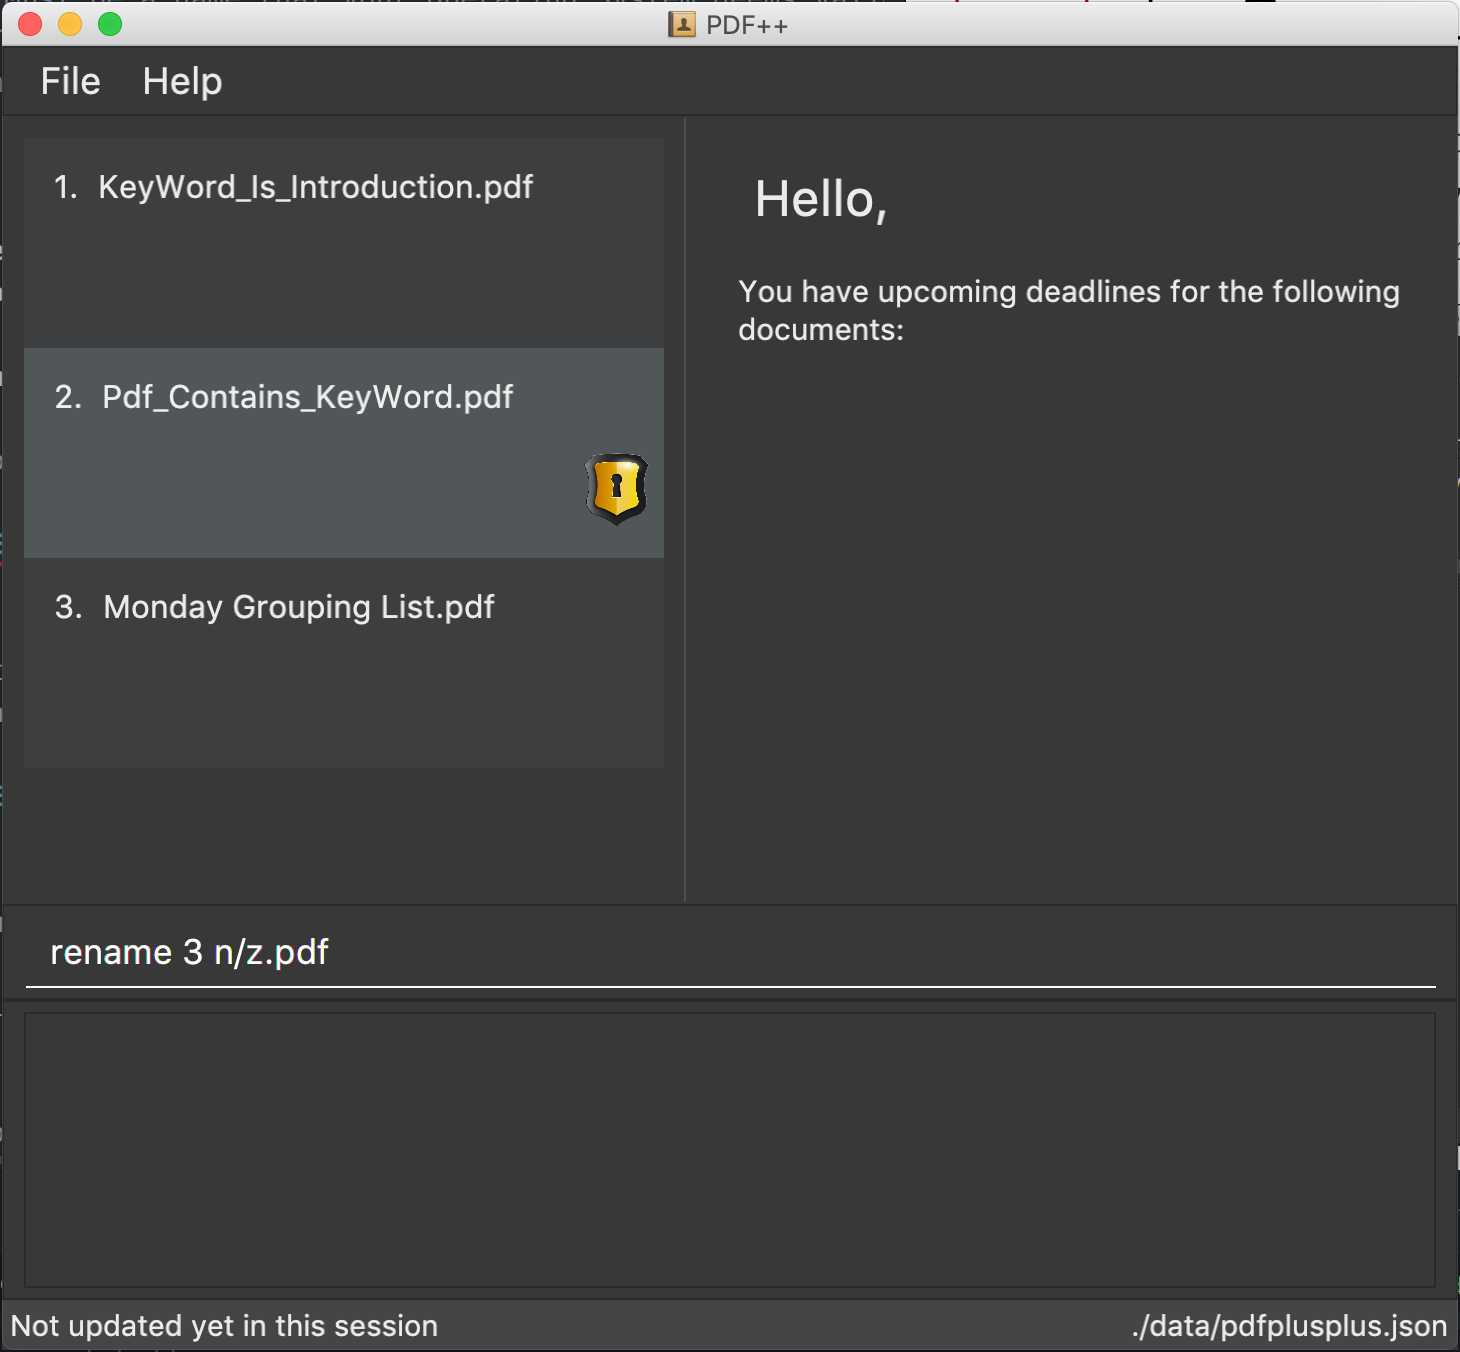
Step 2: The user chooses a Pdf that they wish to edit, in this case Monday Grouping List.pdf, and
enters the rename command into the TI Interface, following the outlined Syntax as
illustrated below.
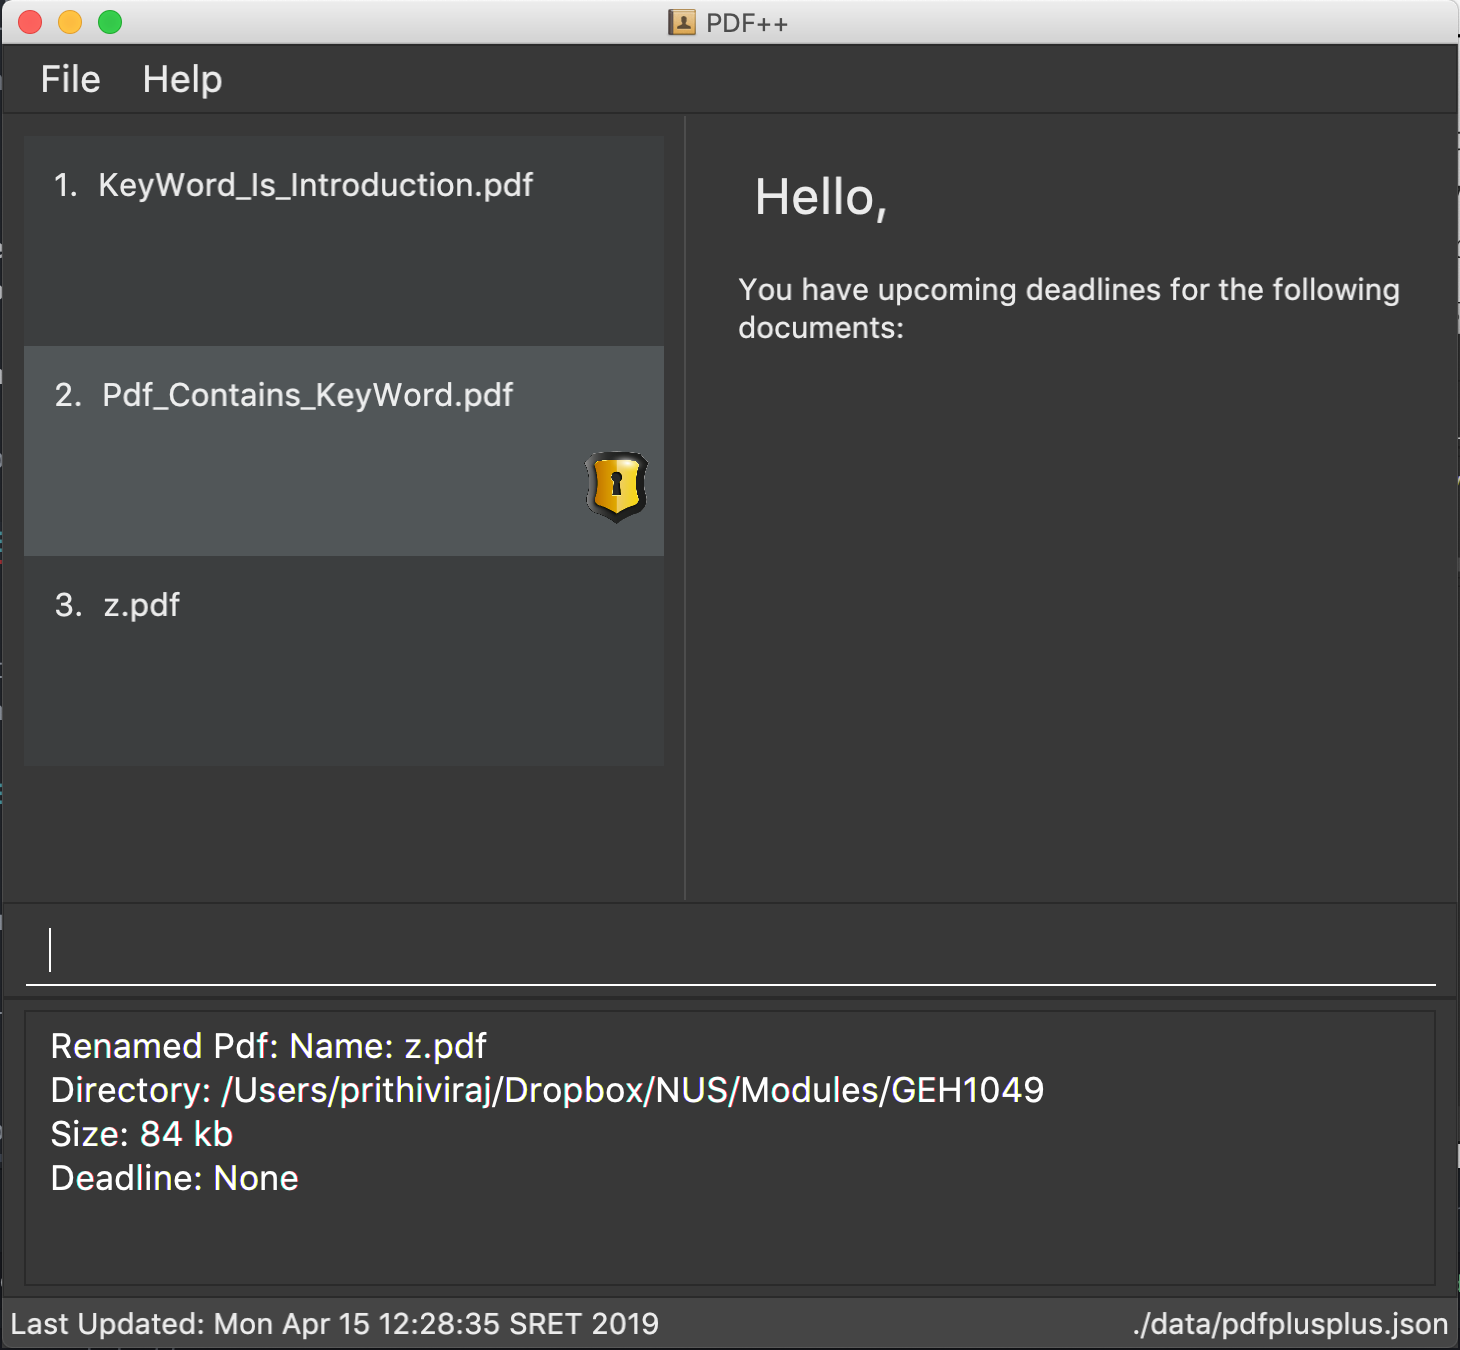
Step 3: If your inputs are deemed valid, the file is then effectively renamed within PDF++ and in your computer itself, thus resulting in an output that matches the image shown below.
3.7. Tagging a file : tag
The tag command allows you to add or remove a tag to a file, specified by the index of the file that is next to the name of the file in the Files Section, highlighted in green.
Format: tag INDEX -a [t/TAG]… [To add a tag]
Format: tag INDEX -r [t/TAG]… [To remove a tag]
-
INDEXrefers to the index of the file that you wish to edit. -
-ais a prefix that tells the application you wish to add a tag to the file. -
-ris a prefix that tells the application you wish to remove a tag from the file.
Example:
-
tag 1 -a t/CS2103T t/SE -
tag 2 -r t/tutorials
3.8. Deleting a file : delete
The delete command lets you delete a file from the application and/or your computer.
In order to delete the file completely from the computer, you must specify the hard parameter to the delete command.
The file that is to be deleted must be specified by the index of the file that is next to the name of the file in the Files Section, highlighted in green.
Format: delete INDEX
Format: delete INDEX hard
-
INDEXrefers to the index of the file that you wish to edit. -
hardis a prefix that tells the application to remove the file from your computer completely.
Example:
-
delete 4 -
delete 3 hard
3.9. Moving a file : move
The move command allows you to move a file, specified by the index of the file that is next to the name of the file in the Files Section, highlighted in green.
The file can be moved from its current folder on your computer to another folder on your computer.
The move command also has a GUI option to allow for an easier file moving experience.
To obtain the full path of a directory, you can follow the steps highlighted in the Step-By-Step Guide of the add command.
Format: move INDEX d/DIRECTORY
-
INDEXrefers to the index of the file that you wish to edit. -
DIRECTORYrefers to the new folder you wish to move your file to.
Example:
-
move 1 d/C:\User\Jeremy\Downloads[Windows Operating System] -
move 1 d//Users/jet/Documents/Important[Mac / Linux Operating System] -
move 1[Any Operating System]
3.10. Exiting the program : exit
This command lets you exit the program.
Format: exit
3.11. Retrieving information about a file: select
Select a file to see more information.
Alternatively, clicking the file in the Files Section, highlighted in green, allows you to view more information pertaining to that file.
This information will be displayed in the Upcoming Deadlines Area, highlighted in red.
Format: select INDEX
-
INDEXrefers to the index of the file that you wish to edit.
Example: select 3
3.12. Setting a deadline for the file : deadline
Set or remove a deadline for a file, specified by the index of the file that is next to the name of the file in the Files Section, highlighted in green.
A file’s deadline is located under its name and has 4 colours to indicate the amount of time you have before it is due.
The colour Green, indicates that there are more than 7 days till the deadline is due, as shown below.

The colour Orange, indicates that you have 7 or fewer days till it is due. As shown below.

The colour Red, indicates that you have reached or failed to complete the task by the due date, as shown below

The colour Blue indicates that you have completed the set task.

All deadlines are also displayed in the Deadlines Section of the application highlighted by Red.
Format: deadline INDEX date/DATE [To Set a Deadline]
Format: deadline INDEX done [To Complete a Deadline]
Format: deadline INDEX remove [To remove a Deadline]
-
INDEXrefers to the index of the file that you wish to edit. -
DATEto the deadline you wish to assign the file. -
doneis the prefix that tells the application that you have completed the deadline. -
removeis the prefix that tells the application that you wish to remove the deadline.
Examples:
-
deadline 1 date/20-02-2019 -
deadline 1 done -
deadline 1 remove
| The date must be in the format of dd-mm-yyyy. |
3.13. Referring to past commands: History
The history command allows you to view the list of commands that are previously entered
into the application.
Format: history
Example:
-
history
If your previous command was encrypt or decrypt, the commands will not be saved to the
application as part of a security concern. A malicious user could potentially refer to the
history to get your password, hence the ability to refer back to these commands was removed.
|
3.14. Filter files by tags: filter
The filter command shows you only the files that contain the tags specified in the filter command.
Format: filter t/TAG…
-
TAGrefers to the tag you wish to filter the files by.
Examples:
-
filter t/JobApplication -
filter t/Lecture t/Week10
3.15. Finding Content: find
The find command allows you to find for files that contain a keyword or phrase
OR find files which contain the entered keyword or phrase inside it.
Format: find KEYWORD
-
KEYWORDrefers to the word that you wish to search for within the files of the application.
Examples:
-
find Introduction -
find Author: George RR Martin
find Author: George RR Martin will not only search for the whole word but also parts of the word
such as George, RR, Martin without regard for the upper or lowercase of the input text. Hence,
a file with the word correct will also be flagged as containing RR.
|
3.15.1. Step-By-Step Guide
If, for example, you wish to locate the files that contain the word Introduction
in its name or files that contain the word Introduction in its internal content.
You may carry out the following steps in order to get your desired list of files.
Step 1: Launch the application by double-clicking the pdfplusplus.jar. To view the following screen.
| Files you observe may be different and depends on the actions you have previously carried out on our application |
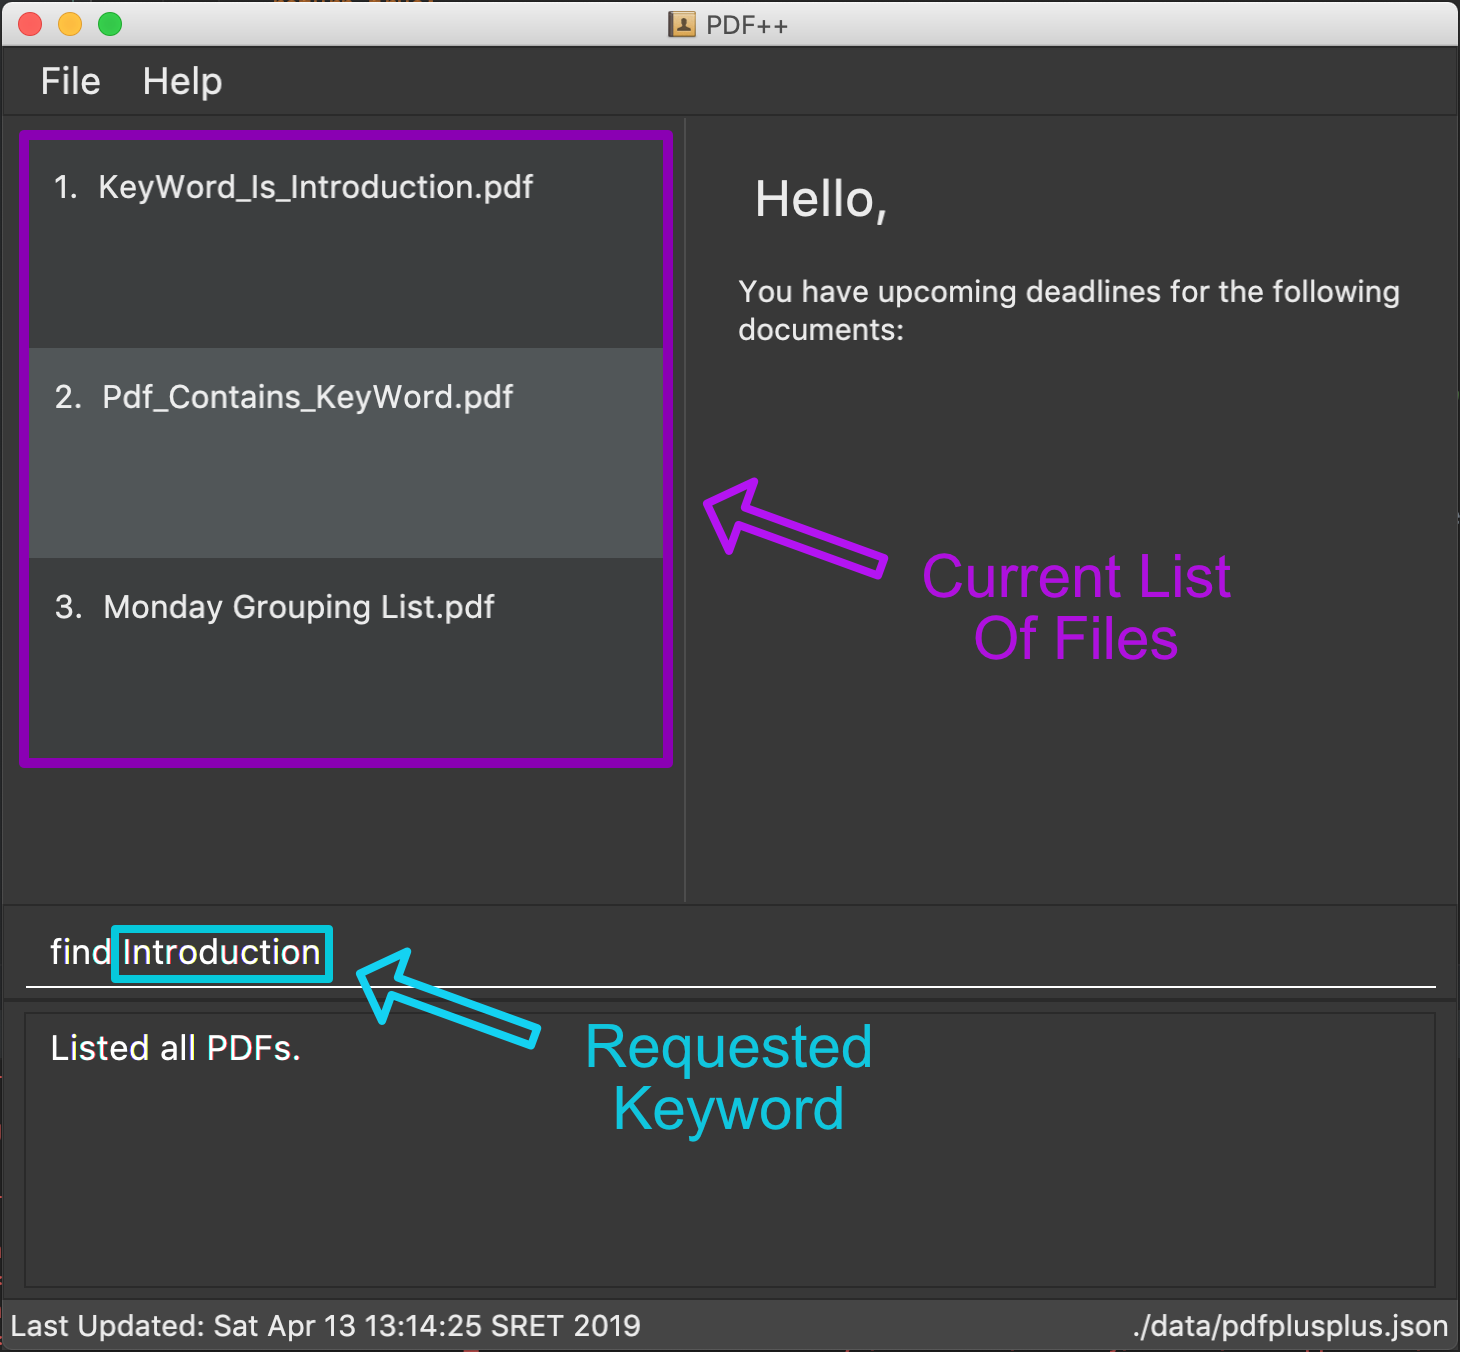
Step 2:
-
As shown by the image, your application should contain an existing list of files.
-
You are to key in the
findcommand followed by the keyword as illustrated by the command format.
Step 3:
-
Finally, press Enter and give the application a short time to sieve through all the files it manages and locate the relevant ones for you.
-
Once the application is done with the task, the following screen should be visible to you.
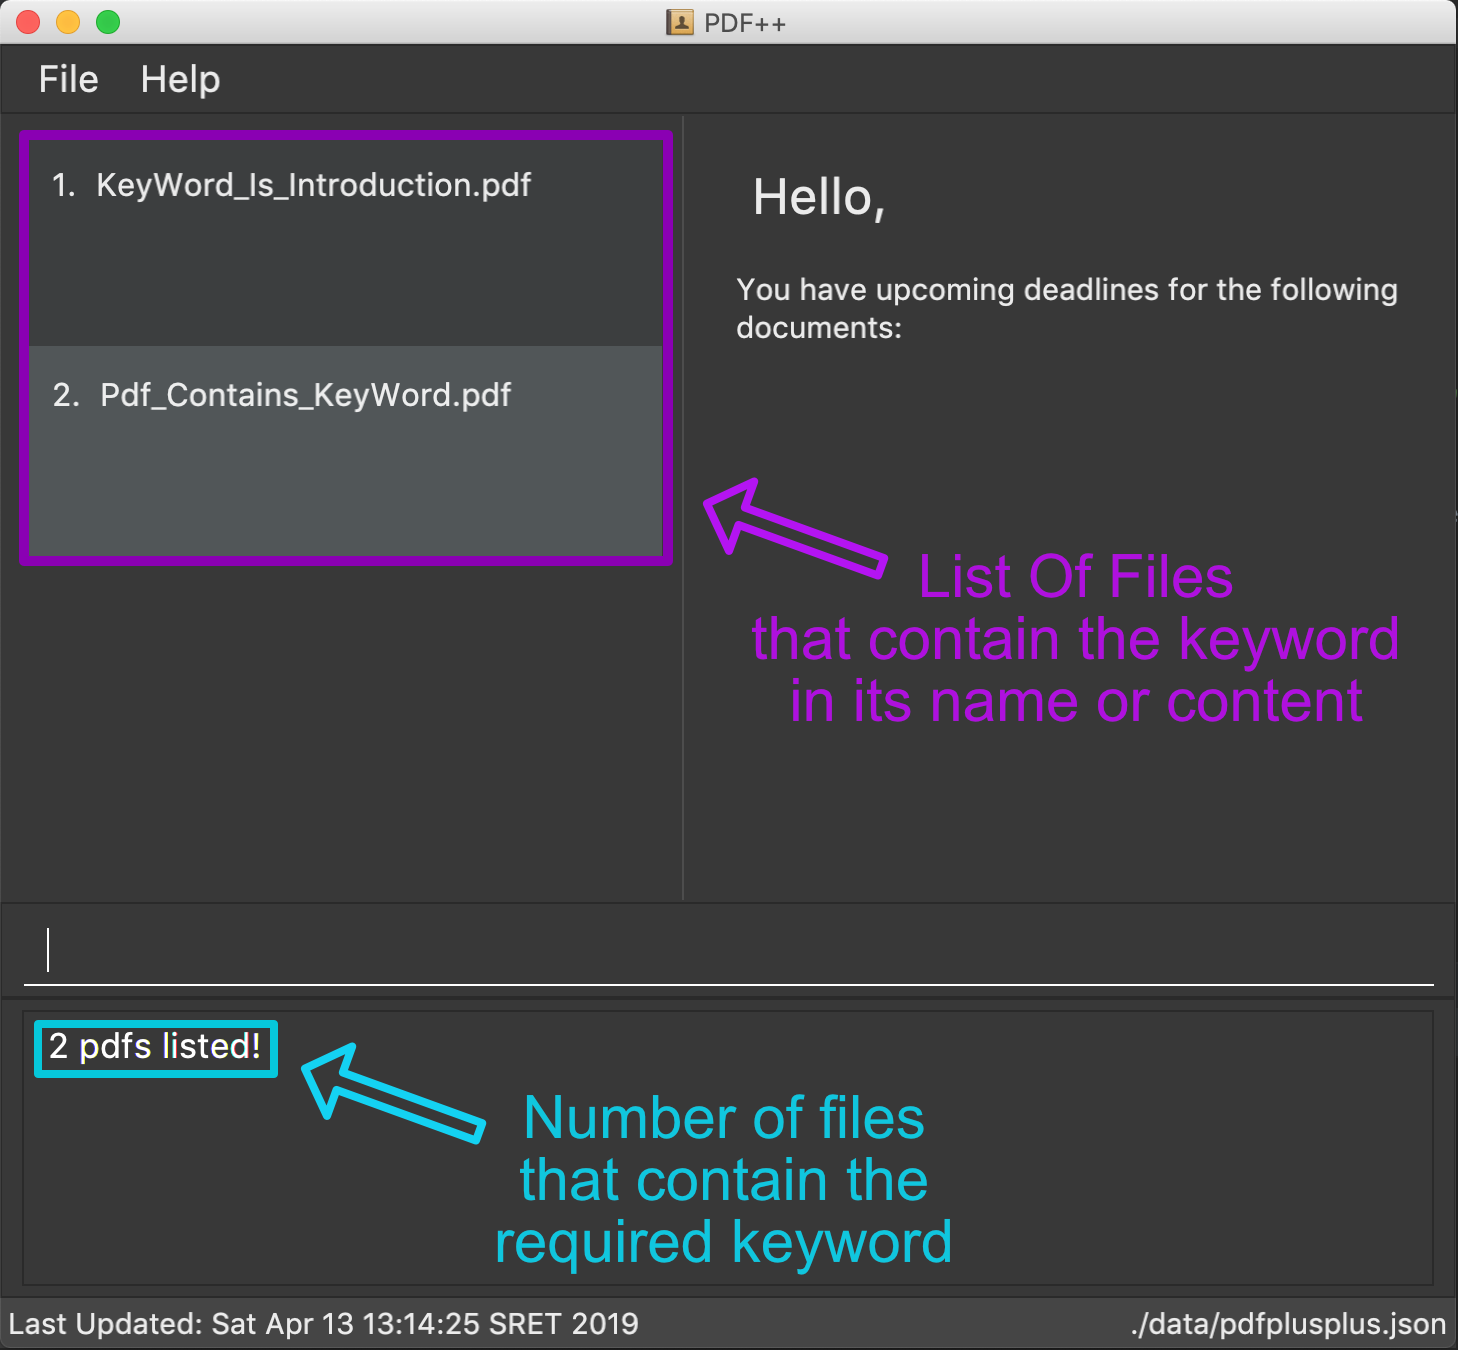
As seen in the image, the files that are relevant to your search will be displayed on the top
left. These files are those that contain the keyword Introduction in its name, and files which
contain the keyword within its content.
The application also shows you other useful information such as, the number of files that
match the criteria you entered into the application as shown in the image above.
And with that, you have successfully utilized the find feature.
When there are many files tracked by the application or if the files tracked by the application
contain many pages, the find command might take a little longer to operate. Hence if your
operating system warns you that the application is not responding, please give the application some time
to finish its operation.
|
As part of a security measure, all files that are encrypted will not be subject to the find command.
This will prevent any information about your secure files from being leaked to malicious users.
|
3.16. File Protection: encrypt & decrypt
PDF++ offers native support for file protection.
The command encrypt allows you to protect your files with a password such that
they cannot be accessed without the password that you had specified.
Similarly, the command decrypt allows you to remove the password that
you had set for the file.
The terms protect and encrypt have the same meaning and will be used
interchangeably.
|
The Encrypt and Decrypt feature has the following syntax:
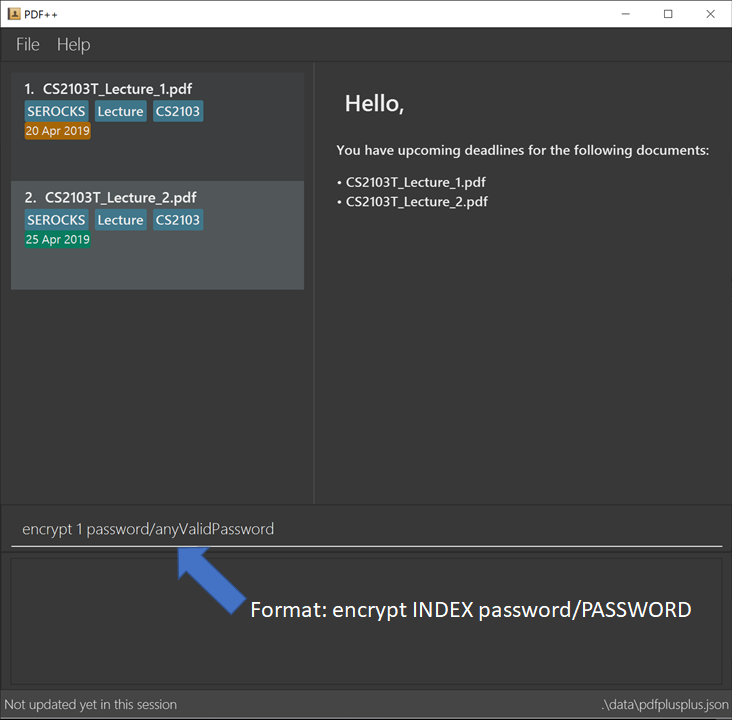
Format: encrypt INDEX password/PASSWORD [For Encryption]
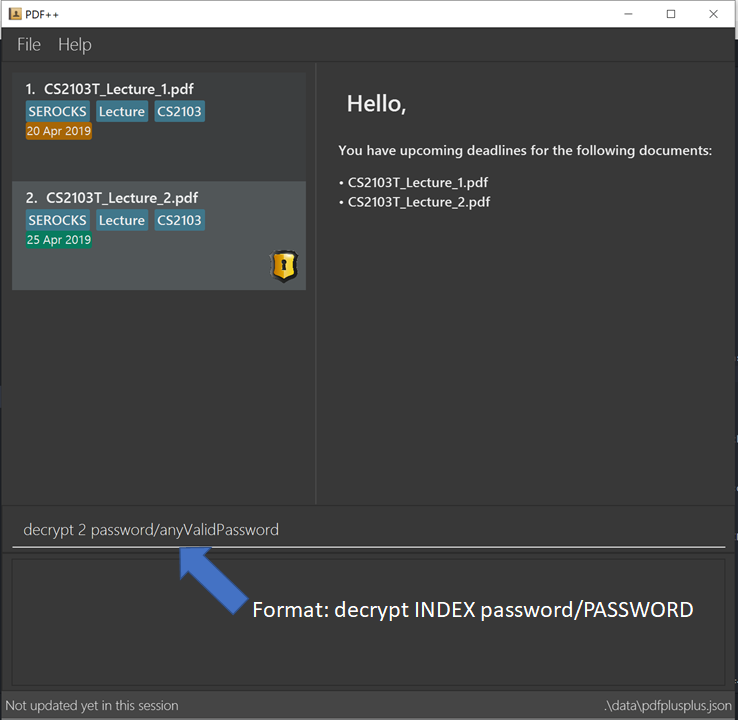
Format: decrypt INDEX password/PASSWORD [For Decryption]
-
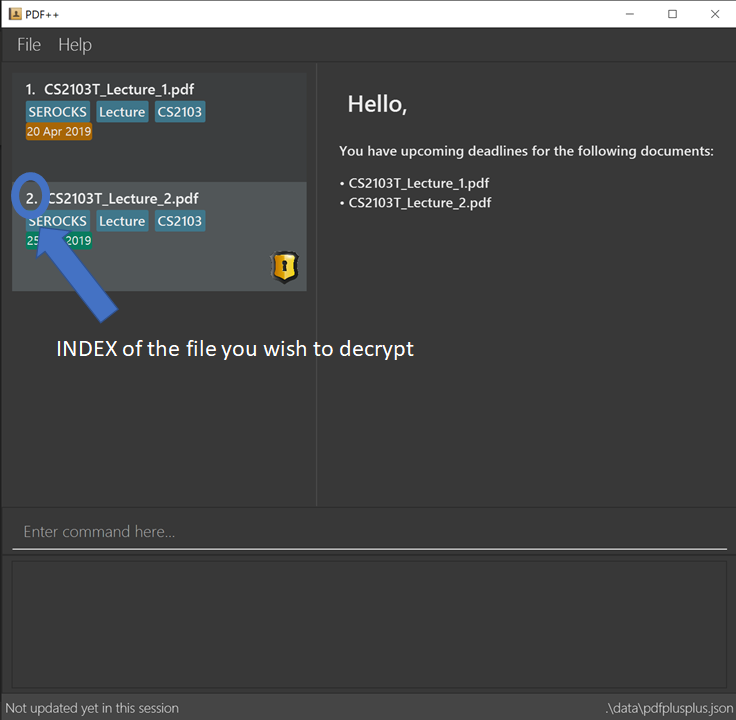
INDEXrefers to the index of the file on the list that you wish to encrypt/decrypt. -
PASSWORDrefers to the password which you wish to assign to the particular file.
Examples:
-
encrypt 2 password/ThisIsNotASecurePassword -
decrypt 2 password/ThisIsNotASecurePassword
Please refer to Encryption Guide or Decryption Guide for help in using these features.
3.16.1. Encryption Guide
encrypt feature will not work on files that are already encrypted.
|
Illustrated below is a sample usage scenario that provides a clear view of the inner workings of the Encrypt feature.
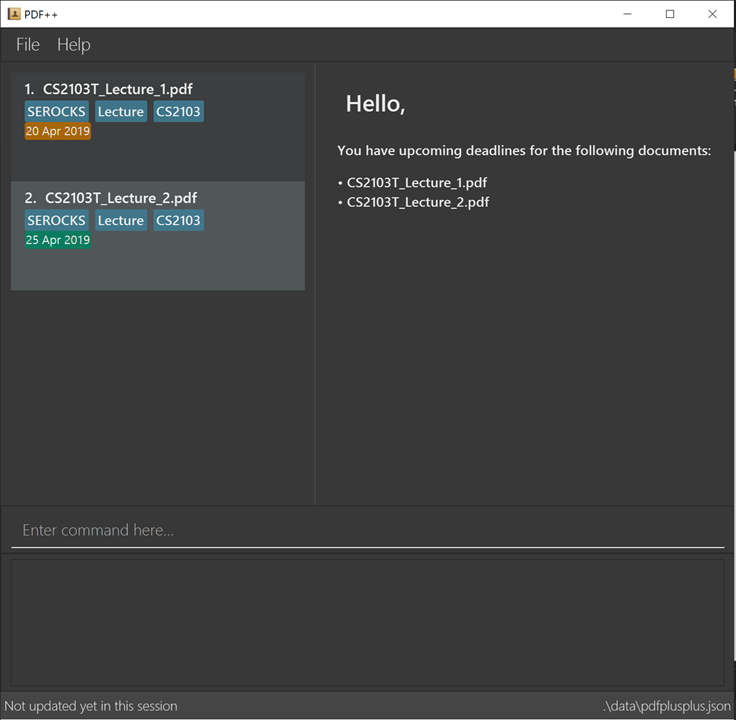
Step 1: Launch the application by double-clicking the pdfplusplus.jar. To view the following screen.
| Files you observe may be different and depends on the actions you have previously carried out on our application |
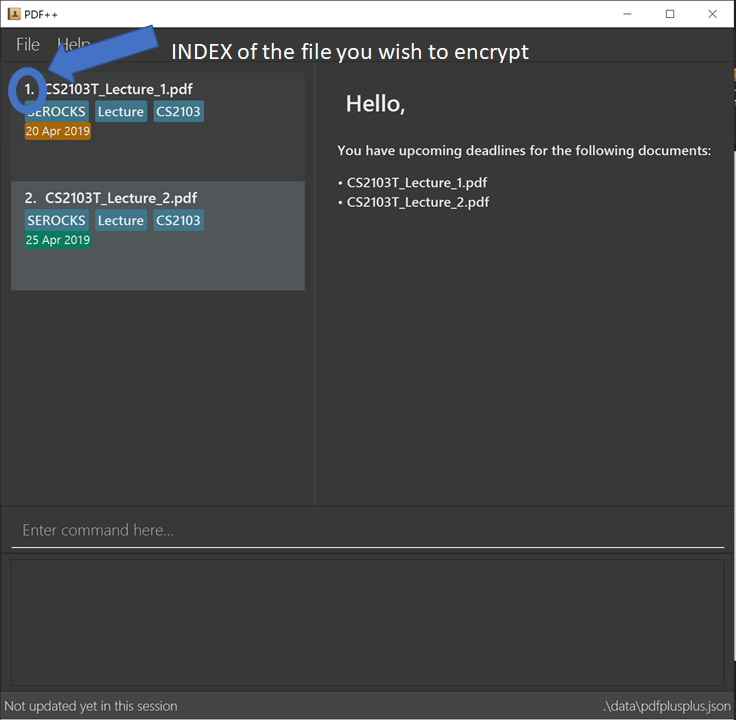
Step 2: Select the file that you wish to encrypt via the INDEX on the list.
Step 3: Enter the encrypt command into the text box, following the outlined syntax as
illustrated below.
Step 4: Upon hitting enter to execute the command, your inputs are verified and if successful, your selected file is encrypted with the given password.
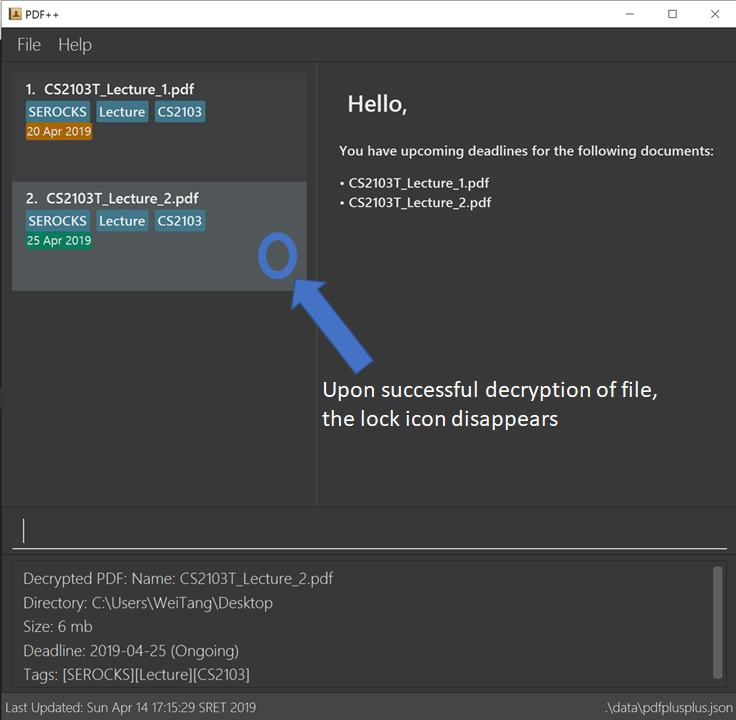
| Upon successful encryption, there will be a lock icon at the bottom right of the card to indicate that the file is an encrypted file. |
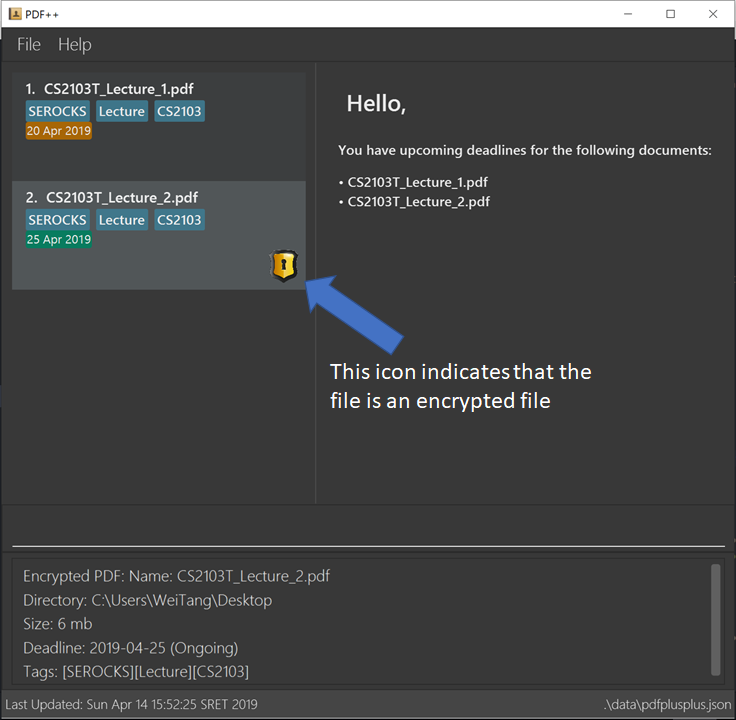
Step 5: If the command passes the validity check, the file you have selected is encrypted.
You can open your file to see the result. Please refer to
Section 3.5, “Opening a file : open” for the open feature.

3.16.2. Decryption Guide
Illustrate below is a sample usage scenario that provides a clear view to the inner workings of the Decrypt feature.
decrypt feature is very similar to encrypt feature.
|
decrypt feature will not work on files that are not encrypted.
|
Step 1: Launch the application, similar to the Step-By-Step Encrypt guide.
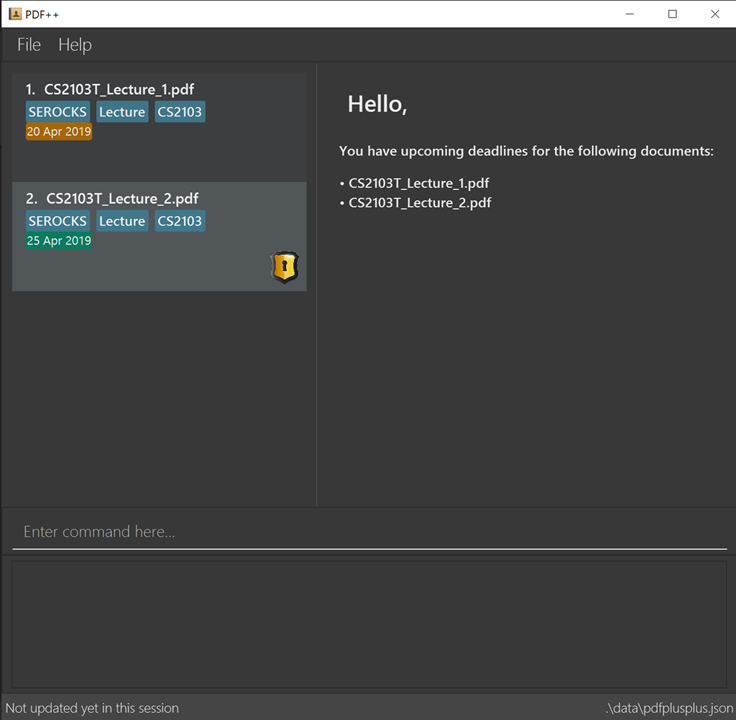
Step 2: You select the file that you wish to decrypt via the INDEX on the list.
Step 3: Enter the decrypt command into the text box, following the outlined syntax as
illustrated below.
| Please enter the password of the encrypted file. You will not be able to decrypt the file without the password. |
Step 4: Upon hitting enter, the application verifies that you have entered the correct password and decrypts your file as shown below.
3.17. Merging Files: merge
With the merge command , you can merge two or more files into a new single file.
The Merge feature has the following syntax:
Format: merge INDEX1 INDEX2 …
-
INDEXrefers to the index of thePdfthat you wish to merge. -
Minimum of two index values have to be provided to the application.
-
It is possible to repeat an index value, the PDF would simply merge with a copy of itself.
Examples:
-
merge 1 2 3 -
merge 1 2 1 -
merge 1 1
The newly created file will be stored in the directory of the INDEX that was first specified.
|
| If the combined file size is > 100MB, the operation will take more than a minute to execute. Please give the application some time to completely execute the operation. |
3.17.1. Step-By-Step Guide
Illustrated below is a sample usage scenario that provides a clear view to the inner
workings of the merge feature.
Step 1: Launch the application by double clicking the pdfplusplus.jar. To view the following screen.
| Files you observe may be different and depends on the actions you have previously carried out on our application |
Step 2: From the main interface of the application, the user chooses the file(s) that
they wish to merge, and enters the merge command into the TI, following
the outlined syntax as illustrated below.
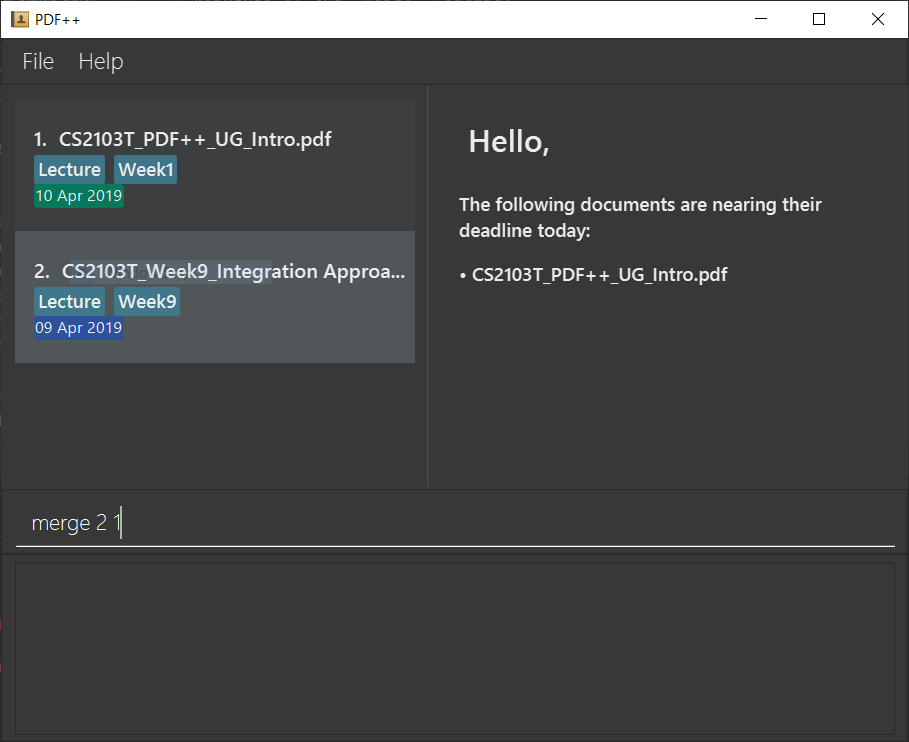
Step 3: After executing the command, the above two files will be merged, with the "CS2103T_PDF++_UG_Intro.pdf" file attached behind your other selected file.
Step 4: The MergeCommand is then executed. The new name of the merged file follows the format: "merged[hashcode].pdf", where hashcode is a random string of letters and numbers. This prevents any naming conflicts between files.
3.18. Saving the data
PDF++ data are saved in the hard disk automatically after any command that changes the data.
There is no need to save manually.
4. Command Summary
-
Add :
add f/PATH_TO_FILE
e.g.add f/C:\Users\Raj\Documents\Tutorial3.pdf -
Rename :
rename INDEX n/NEW_NAME
e.g.rename 2 n/Resume.pdf -
List :
list -
Open :
open INDEXe.g.open 3 -
Delete :
delete INDEX
e.g.delete 4 -
Move :
move INDEX d/LOCATIONe.g.move 3 d/C:\User\Jeremy\Downloads -
Tag :
tag -a INDEX t/TAG…ortag -r INDEX t/TAG
e.g.tag 3 -a t/DijkstraGraph t/Tutorial,tag 1 -r t/Homework -
Filter :
filter t/KEYWORD…
e.g.filter t/GraphsDFS -
Deadline :
deadline INDEX date/DATEordeadline INDEX doneordeadline INDEX remove
e.g.deadline 3 date/20-02-2019,deadline 2 done,deadline 2 remove -
Select :
select INDEX
e.g.select 3 -
Encrypt :
encrypt INDEX password/PASSWORD
e.g.encrypt 2 password/superPASSWORD -
Decrypt :
decrypt INDEX password/PASSWORD
e.g.decrypt 2 password/superPASSWORD -
Merge :
merge INDEX INDEX…
e.gmerge 1 2 1 -
Sort :
sort CRITERIA ORDER
e.gsort name down,sort deadline up,sort size down -
Help :
help -
History :
history -
Exit :
exit
5. Glossary
-
Command : Keyword that tells the application what to do.
-
GUI : Graphical User Interface
-
TI : Text Input
-
Merge : Attach the contents of one PDF to another.
-
Encrypt : To lock a PDF with a password.
-
Decrypt : To remove the lock from a PDF. (Provided it already has one)
-
Filter : To sieve relevant files from irrelevant ones.
-
Deadline : To set due date to a file.
-
Tag : A text label attached to a file for identification or providing more information.
6. Upcoming Features in v2.0
-
Connection to External Servers:
We plan to allow you to connect directly to your cloud servers to synchronize documents across several devices.
These servers include popular sites such as LumiNus. -
Login Page:
We plan to include a Login Page to help authenticate you to the application so that you can access the app more securely.
Furthermore, together with the connection to external servers feature, this feature will allow you to access your documents anywhere you are. -
Text-to-Speech:
We plan to implement a Text-to-Speech option that could potentially read the contents of your file or the name of your file to you. -
Multiple File Formats:
We plan to allow you to use our application with file-types beyond.pdffiles. -
Undo/Redo:
Due to some security concerns that we faced with the undo/redo feature, it will be delayed until we have found a solution that will not compromise the privacy of our users.